Do you have screenshots of this in action?
More Useropts Options
341 posts · 2006-03-02 14:03:09 to 2009-05-29 14:43:01
Faithlessness wrote:
But on those shots my blurscale and lightpool radius isn't set correctly.
Message Edited by Faithlessness on 06.08.2006 08:47 PM
Is it pitch black only at night with those commands or is it really dark all the time with them on?

It's still days, but the colors are much sharper and darker.
Okay, here goes. I'm sick of waiting for UPS to deliver my gamecard, so I made a temporary trial account to use for the time being.
Dragonram: Rarebit has said grass is serverside, and my testing confirms. Drawgrass is boolean (true or false), and load_dist / draw_percent don't appear to be client settable. Sorry Dathen's launcher screenie was done by hexediting the launcher.exe's text strings, most likely through a disassembler and recompiler (or plain ol' Notepad). Editing the files like that is against the EULA, which is why I haven't discussed that sorta stuff.
Phrog: I myself haven't had too much success with Richworld overrides; even setting values of 9999999999 doesn't seem to create the desired "really really busy" effect. Hopefully Void finds something :o
Canuck13: If by lowering graphics you mean making the game run at reduced graphical quality, then well, useropts can do that. You can supplement lowering options in "Advanced Video Options" with these parameters:
RezMgr_Dead_Rez_Count = 0 (resource manager)
WR_DrawWeather = 0
WR_DrawSkyBox = 0
WR_LoadProps = 0
WR_ExtFarDist = 500
WR_SLodFarDist = 5
WR_PrefabLODEnable = 0
Detail_CfgDetail = 1 (graphics detail)
CopyMassiveData = 0 (should stop ads from loading)
Richworld_Enabled = 0
Keep in mind that not all of these might work, I haven't had the time to test each individual parameter but know most of them should help you out.
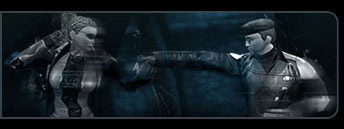
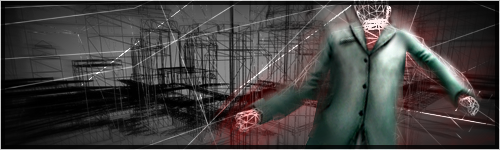
Traxada: Ah, the infamous HackView. This is the parameter everyone asks me about, because they can never get it to work. I myself posted once that it was broken, I believed the devs ruined it when in fact it had stopped working for me. It's a weird parameter - sometimes jacking in and out will make it work, sometimes disabling other parameters will make it work... weird, really. Anyway, these are the settings I currently use, and they make the game look like this.
CmpChar_HackView_Enable = 1
CmpChar_HackView_MinLvl_Float = 10
CmpChar_HackView_MaxLvl = 700
X-Lord-Slayer-X: Useropts.cfg works by calling specific parameters that are defined by the client. The engine is programmed to read after each newline hex value for a parameter, thus, when you make a new line which doesn't contain a parameter, it refuses to work, as "(make the duel time longer)" is not a valid parameter set by the client. To override this, tell the client that those specific lines should not be loaded by inserting a "#" beforehand.
Vesuveus: The parameter "wr_envdaylength" tells the client the time in seconds that one daily weather cycle should last. So, if you set wr_envdaylength = 10, the sun will rise and set every 10 seconds, and the weekly weather cycle will rotate in a minute or so. You can add any value you want in there - if you jack in and find that you really like the weather, you can jackout, set the parameter to 99999999999999999999999999 to freeze the weather, and jack back in immediately.
Faithlessness: It's certainly odd that CMYK worked to solve your problem, as I don't have those parameters in my list. Either a) the client was being funky, b) they're new parameters and I need to update my list, or c) they were defined in an unconventional place. Odd.
Dragonram: Rarebit has said grass is serverside, and my testing confirms. Drawgrass is boolean (true or false), and load_dist / draw_percent don't appear to be client settable. Sorry
Dathen's launcher screenie was done by hexediting the launcher.exe's text strings, most likely through a disassembler and recompiler (or plain ol' Notepad). Editing the files like that is against the EULA, which is why I haven't discussed that sorta stuff.Phrog: I myself haven't had too much success with Richworld overrides; even setting values of 9999999999 doesn't seem to create the desired "really really busy" effect. Hopefully Void finds something :o
Canuck13: If by lowering graphics you mean making the game run at reduced graphical quality, then well, useropts can do that. You can supplement lowering options in "Advanced Video Options" with these parameters:
RezMgr_Dead_Rez_Count = 0 (resource manager)
WR_DrawWeather = 0
WR_DrawSkyBox = 0
WR_LoadProps = 0
WR_ExtFarDist = 500
WR_SLodFarDist = 5
WR_PrefabLODEnable = 0
Detail_CfgDetail = 1 (graphics detail)
CopyMassiveData = 0 (should stop ads from loading)
Richworld_Enabled = 0
Keep in mind that not all of these might work, I haven't had the time to test each individual parameter but know most of them should help you out.
Traxada: Ah, the infamous HackView. This is the parameter everyone asks me about, because they can never get it to work. I myself posted once that it was broken, I believed the devs ruined it when in fact it had stopped working for me. It's a weird parameter - sometimes jacking in and out will make it work, sometimes disabling other parameters will make it work... weird, really. Anyway, these are the settings I currently use, and they make the game look like this.
CmpChar_HackView_Enable = 1
CmpChar_HackView_MinLvl_Float = 10
CmpChar_HackView_MaxLvl = 700
X-Lord-Slayer-X: Useropts.cfg works by calling specific parameters that are defined by the client. The engine is programmed to read after each newline hex value for a parameter, thus, when you make a new line which doesn't contain a parameter, it refuses to work, as "(make the duel time longer)" is not a valid parameter set by the client. To override this, tell the client that those specific lines should not be loaded by inserting a "#" beforehand.
Vesuveus: The parameter "wr_envdaylength" tells the client the time in seconds that one daily weather cycle should last. So, if you set wr_envdaylength = 10, the sun will rise and set every 10 seconds, and the weekly weather cycle will rotate in a minute or so. You can add any value you want in there - if you jack in and find that you really like the weather, you can jackout, set the parameter to 99999999999999999999999999 to freeze the weather, and jack back in immediately.
Faithlessness: It's certainly odd that CMYK worked to solve your problem, as I don't have those parameters in my list. Either a) the client was being funky, b) they're new parameters and I need to update my list, or c) they were defined in an unconventional place. Odd.
Hey. I've been playing around with some settings that Warboy gave to me for the city crowding... The trick seems to be that the longer you leave it running (ie don't use a hardline or a subway), the more bluepills you'll get walking around. Maybe it's truly random and I'm just seeing things. Anyway, here are the settings he supplied me with. They seem to do reasonably well.
# Crowded City Mode
Richworld_Enabled = 1
Richworld_CarDensity = 500000
Richworld_PedDensity = 500000
Richworld_CarDensityUser = 500000
Richworld_PedDensityUser = 500000
Richworld_MaxCars = 500000
Richworld_MaxPeddies = 500000
Richworld_PopularityUncommon = 125000
Richworld_PopularityCommon = 150000
Richworld_PopularityPopular = 200000
Thanks, Warboy. Maybe you're not a total n00b after all.
- Void
Recursion: n - See Recursion.
Nice, Void/Warboy 
Those settings lag me too much for Fraps, but they make for some darn good screenshots.


Those settings lag me too much for Fraps, but they make for some darn good screenshots.
omg im in that uber sparkly picture....im gonna try again...
Current Organization: Machines
Server: Vector-Hostile
Faction: Sentience
Occupation: Machinist Military
Status: Active
Server: Vector-Hostile
Faction: Sentience
Occupation: Machinist Military
Status: Active
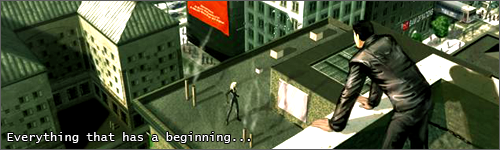
... Is that MXO? Wow. It's so... cinematic. Did you edit that shot, or is that all through Useropts?
- Void
Recursion: n - See Recursion.
No lol.. I think my computer would die if that was all useropts. That took a lot of Photoshop
Although I am going to try to work on getting more fog/haze and a deeper green ingame, will post if I get anything to work.
Although I am going to try to work on getting more fog/haze and a deeper green ingame, will post if I get anything to work.
Beautiful.
If the game can render all those filters without us having to Photoshop it then :smileyhappy:
If the game can render all those filters without us having to Photoshop it then :smileyhappy:

Now I realised that the overbright effect in the game is tinted green, and I can't really get that green colour away, so I guess I will have to try to hunt a little bit unless someone know any possible command.
Might also add that overbright is named screen_glow in the command lines, or at least all these lines do affect it.
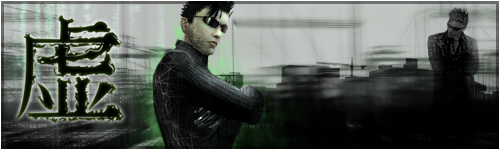
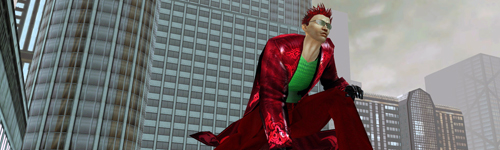
Kickass Bayamo, I got bullet time and green tint to something I really love!

Ooh, nice green tint dude nice action shot too :smileywink:
- Ð
- Ð
Great and mighty null!!!!
Message Edited by PBlade on 06.12.2006 11:33 AM
*sigh*
I was playing around with some settings on my trial account yesterday.
As this video shows, I was able to achieve a first person effect (although some details were sacrificed due to the large number of parameters I was testing at once).
I was all ready to post the parameter on here and explain how to use it... and then BOOM, my character appeared onscreen. It turns out that it wasn't useropts that caused the First Person mode, rather, the fact that I was using all my bandwidth for Azureus torrents. Anyway, this caused my client to not download textures for my character model and objects like hardlines / benches / other people... so a lot was left out. The borders around the world edges are from other useropts parameters I was testing. So, if anyone needs to get a first person view that ISN'T over your character's head, and would like to move quickly as opposed to walking backwards in sneak, try using all your internet bandwidth doing something else. (I'll warn you to be careful about doing this on a PvP server, I downloaded torrents while trying to PvP once and got attacked by invisible people).
So, um, yeah. I'm back.
Post 1100 ftw.
I was playing around with some settings on my trial account yesterday.
As this video shows, I was able to achieve a first person effect (although some details were sacrificed due to the large number of parameters I was testing at once).
I was all ready to post the parameter on here and explain how to use it... and then BOOM, my character appeared onscreen. It turns out that it wasn't useropts that caused the First Person mode, rather, the fact that I was using all my bandwidth for Azureus torrents.
Anyway, this caused my client to not download textures for my character model and objects like hardlines / benches / other people... so a lot was left out. The borders around the world edges are from other useropts parameters I was testing. So, if anyone needs to get a first person view that ISN'T over your character's head, and would like to move quickly as opposed to walking backwards in sneak, try using all your internet bandwidth doing something else. (I'll warn you to be careful about doing this on a PvP server, I downloaded torrents while trying to PvP once and got attacked by invisible people).So, um, yeah. I'm back.
Post 1100 ftw.
Is there is a way to make the game appear in only black and white?
Use an old monitor.
... Actually, I'd be interested in that myself. Though I haven't found anything that would support it yet.
- Void
... Actually, I'd be interested in that myself. Though I haven't found anything that would support it yet.
- Void
Recursion: n - See Recursion.
What exactly do I need for constant bullettime?
ZaneZavin wrote:
What exactly do I need for constant bullettime?
TeeHee BOOM! :smileyvery-happy:
#This always places bullet time on woo!
RenderBulletTimeOnly = 1
AlwaysDoBulletTime = 1
I recommend using it with this :smileywink:
#This allows moveable camera during bullet time effect.
AllowBulletTimeCamera = 0
- Ð
I use this to get my sweet pics =P
Dragonram wrote:
ZaneZavin wrote:
What exactly do I need for constant bullettime?
TeeHee BOOM! :smileyvery-happy:
#This always places bullet time on woo!
RenderBulletTimeOnly = 1
AlwaysDoBulletTime = 1
I recommend using it with this :smileywink:
#This allows moveable camera during bullet time effect.
AllowBulletTimeCamera = 0
- Ð
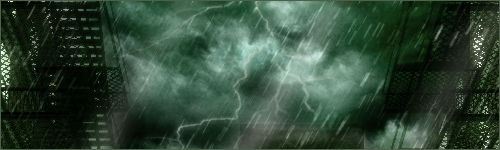
wr_envdaylength = 0
That setting ^ gives you this:


Seems to remove all world render textures and character textures and
just leaves....blackness. No weather....no life. Pretty nifty though.
That setting ^ gives you this:
Seems to remove all world render textures and character textures and
just leaves....blackness. No weather....no life. Pretty nifty though.
Whoa.
Traxada wrote:
wr_envdaylength = 0
That setting ^ gives you this:
Seems to remove all world render textures and character textures and just leaves....blackness. No weather....no life. Pretty nifty though.
Cool!
Edit: I just tried this, and one interesting effect is the "buildings" that are always in the background of the city actual gain detail instead of simply existing as vague outlines in fog. Does anyone know of a way to retain this effect and keep the regular city textures?
Message Edited by Othinn1 on 06.15.2006 07:43 PM
- An MxO live event transcript website:
"Archival Science in a Post-War Simulation".
-
"Logging Tips for New People and Veterans Alike".
-
"Submit Your Logs".
"Archival Science in a Post-War Simulation".
-
"Logging Tips for New People and Veterans Alike".
-
"Submit Your Logs".
Just wanted to say, thank you, for all the input in this thread...and to Bayamo =D
Helps a lot for those of us so overplayed on everything else to do in mega city :smileyvery-happy:
Helps a lot for those of us so overplayed on everything else to do in mega city :smileyvery-happy:
I tried that blackness thing and it's really weird. But very cool though. When your inside buildings, everything is the same except people's RSI's look darker. And on top of the Government Buildings downtown is a cool place to see those weird textured buildings.
Oh, and I did the Hack View settings and the constant bullet time settings to get a freakin cool screenshot that is now in my sig. All thanks to you, Bayamo. :smileyhappy:
ThePigeonKing wrote:
May I also suggest adding
ScreenFilters_GreenShift_Color_0_R = 1
to your little useropt greenshift list if you want all red all the time (doesn't fade to contrasting dark).
Now, if anyone wants, say, blue tint, just make all of the B values = 1. For intense green, all G values = 1.
But for all red all the time:
ScreenFilters_GreenShift_Color_1_R = 1
ScreenFilters_GreenShift_Color_1_G = 0
ScreenFilters_GreenShift_Color_1_B = 0
ScreenFilters_GreenShift_Color_0_R = 1
ScreenFilters_GreenShift_Color_0_G = 0
ScreenFilters_GreenShift_Color_0_B = 0
However, I still haven't seen it in day time. *Checks watch*...Soon, though.
EDIT:
Muhahahahah!
Message Edited by ThePigeonKing on 03-19-200610:11 AM


A little explanation:
These values are normalised (adjust the values so that the lowwest value becomes 0 and the highest becomes 1 ... all others become somewhere in between)
(assumes system defaults if not on useropts)
It seems to be an initial slider value as they decrease in effect over time. Possibly these are the values used when Matrix code is initailly shown (to prevent colour filters over the code)
ScreenFilters_GreenShift_Color_1_R = 1
ScreenFilters_GreenShift_Color_1_G = 0
ScreenFilters_GreenShift_Color_1_B = 0
Presumably these values are the values to fade to from the previous 3.
ScreenFilters_GreenShift_Color_0_R = 1
ScreenFilters_GreenShift_Color_0_G = 0
ScreenFilters_GreenShift_Color_0_B = 0
these values are the ones appiles by the "green tint" which is actually a colour tint overlain.
a few colours (in RGB order):
cyan = 0,1,1
yellow = 1,1,0
magenta = 1,0,1
orange = 1,0.5,0
brown = 0.9, 0.6, 0.2
purple = 0.6, 0, 0.6
For a lighter version of the colour you want, increase the values by an equal percent.
so if red is 1,0,0 then light pink is 1, 0.7, 0.7
all three values being the same is a variation of white (111) or black (000) - however this will not do much depending on the colour blend mode values closer to black may darken the screen slightly
phi wrote:
ThePigeonKing wrote:
May I also suggest adding
ScreenFilters_GreenShift_Color_0_R = 1
to your little useropt greenshift list if you want all red all the time (doesn't fade to contrasting dark).
Now, if anyone wants, say, blue tint, just make all of the B values = 1. For intense green, all G values = 1.
But for all red all the time:
ScreenFilters_GreenShift_Color_1_R = 1
ScreenFilters_GreenShift_Color_1_G = 0
ScreenFilters_GreenShift_Color_1_B = 0
ScreenFilters_GreenShift_Color_0_R = 1
ScreenFilters_GreenShift_Color_0_G = 0
ScreenFilters_GreenShift_Color_0_B = 0
However, I still haven't seen it in day time. *Checks watch*...Soon, though.
EDIT:
Muhahahahah!
Message Edited by ThePigeonKing on 03-19-200610:11 AM
A little explanation:
These values are normalised (adjust the values so that the lowwest value becomes 0 and the highest becomes 1 ... all others become somewhere in between)
(assumes system defaults if not on useropts)
It seems to be an initial slider value as they decrease in effect over time. Possibly these are the values used when Matrix code is initailly shown (to prevent colour filters over the code)
ScreenFilters_GreenShift_Color_1_R = 1
ScreenFilters_GreenShift_Color_1_G = 0
ScreenFilters_GreenShift_Color_1_B = 0
Presumably these values are the values to fade to from the previous 3.
ScreenFilters_GreenShift_Color_0_R = 1
ScreenFilters_GreenShift_Color_0_G = 0
ScreenFilters_GreenShift_Color_0_B = 0
these values are the ones appiles by the "green tint" which is actually a colour tint overlain.
a few colours (in RGB order):
cyan = 0,1,1
yellow = 1,1,0
magenta = 1,0,1
orange = 1,0.5,0
brown = 0.9, 0.6, 0.2
purple = 0.6, 0, 0.6
For a lighter version of the colour you want, increase the values by an equal percent.
so if red is 1,0,0 then light pink is 1, 0.7, 0.7
all three values being the same is a variation of white (111) or black (000) - however this will not do much depending on the colour blend mode values closer to black may darken the screen slightly
....Yeeeeeaaaaaaah. Right. Say that again, but for the stupid people this time.
But eh... I have all the 6 rgb commands set to 0 and the two k (black) commands enabled... and it works excellent too.
I can't get hackview to work! Noooo!!
CmpChar_HackView_Enable = 1
CmpChar_HackView_MinLvl_Float = 10
CmpChar_HackView_MaxLvl = 700
..right?
CmpChar_HackView_Enable = 1
CmpChar_HackView_MinLvl_Float = 10
CmpChar_HackView_MaxLvl = 700
..right?

Roukan wrote:
I can't get hackview to work! Noooo!!
CmpChar_HackView_Enable = 1
CmpChar_HackView_MinLvl_Float = 10
CmpChar_HackView_MaxLvl = 700
..right?
Yeah, that's what's in my useropts and it works fine for me. But maybe you've got the same thing happening to you that I had. At one point, some of my useropts were working fine, but then some weren't working and I didn't know why. Turns out, one line didn't have # before it and it blocked everything under it from working. But, I didn't put the # there because it was a continuous line from before. Here's what I had.
#Toggles "nightlight" Set Bright_Scale to 0. Default is 0.915. Radius
default is 5. PRoj_Anle default is 1.8
But, at "default" it wrapped around to the line under it and everything under it stopped working. So, where it wrapped around I had to put that extra # for it to work, like so.
#Toggles "nightlight" Set Bright_Scale to 0. Default is 0.915. Radius
#default is 5. PRoj_Anle default is 1.8
Perhaps you've got something like this that's screwing up your configs.
But other than that, it should work.
Splash0 = ""
SplashDelay0 = 1
Splash1 = ""
SplashDelay1 = 1
Splash2 = ""
SplashDelay2 = 1
Splash3 = ""
SplashDelay3 = 1
Splash4 = ""
SplashDelay4 = 1
Splash5 = ""
SplashDelay5 = 1
# Turning the matrix loading off (green lagin symbols)
WR_MatrixView_Min_T = -1.0
WR_MatrixView_Max_T = 0.0
ILCameraMode = 2
CameraMaxSpeed = 1000
TargetClearOnClick = 0
# Camera Height to character
# 1.00 is the top of the head... good for movies
CameraHeightOffset = 1.25
# Camera Wall Clipping (nice)
CameraPhysics = 0
# Camera Viewing Distance
# Combined with wall clipping, you can see forever!!!
# Actually I think it is less than this... but whatever... =)
CameraMaxDist = 9000000
wr_envdaylength = 15000
AllowBulletTimeCamera = 0
ScreenShot_Filename_Base = "./screenie"
ScreenShot_JPG_Quality = 500
ScreenFilters_GreenShift_Color_1_R = 0
ScreenFilters_GreenShift_Color_1_G = 0
ScreenFilters_GreenShift_Color_1_B = 20
ScreenFilters_GreenShift_Color_0_R = 0
ScreenFilters_GreenShift_Color_0_G = 0
ScreenFilters_GreenShift_Color_0_B = 20
CmpChar_HackView_Enable = 1
CmpChar_HackView_MinLvl_Float = 10
CmpChar_HackView_MaxLvl = 700
RenderBulletTimeOnly = 1
AlwaysDoBulletTime = 1
AllowBulletTimeCamera = 0
Those are my useropts. The bullettime one works, it's just hackview.
Hmm...that's really strange. It matches exactly with what I have. So, I don't know why it wouldn't work unless you have something else turned on that may turn Hackview off by accident. I would try putting # in front of everything in there except Hackview and see if it turns on. And if it does, then turn them back on one by one and you'll see if one of them is preventing Hackview from working.
Other than that I don't know what to tell you except wait for Bayamo. :smileywink:
As of right now I'm unable to get HackView to work, but I've been doing some heavy-duty useropts playing lately, have had a few requests that I'm trying to work out. I'd try backing up your current useropts, then making a new one just with HackView in it, and if it works add the other parameters one by one.
BayamosHatesUPS wrote:
Traxada: Ah, the infamous HackView. This is the parameter everyone asks me about, because they can never get it to work. I myself posted once that it was broken, I believed the devs ruined it when in fact it had stopped working for me. It's a weird parameter - sometimes jacking in and out will make it work, sometimes disabling other parameters will make it work... weird, really. Anyway, these are the settings I currently use, and they make the game look like this.
CmpChar_HackView_Enable = 1
CmpChar_HackView_MinLvl_Float = 10
CmpChar_HackView_MaxLvl = 700
How do you do the first person view? i think that would be view helpful for taking pics of events and such.
Most realistic is to go into mood sly or sneak and turn your character around.. with useropts you can use this instead:
CameraHeightOffset = 1.5
Note that the camera will be moved to focus at above your head... so shots will be a little bit fisheyed like HJ view. If you jump the camera settings will reset.
CameraHeightOffset = 1.5
Note that the camera will be moved to focus at above your head... so shots will be a little bit fisheyed like HJ view. If you jump the camera settings will reset.
All this stuff is fantastic! Now, Hackerview, is that the command to get rid of all that stuff that happens when use commands. Stuff = Red graphical stuff.
Trying to get my head around it all at the moment, at work so I havent had a chance to test anything yet.
Trying to get my head around it all at the moment, at work so I havent had a chance to test anything yet.

Has anyone found a way to get hackview to work yet?
Back from Las Vegas. Stop.
HackView is this code glow effect thing, doesn't remove effects. Stop.
To make it work have Overbright and Green Filter turned off before you open MXO. Stop.
HackView is this code glow effect thing, doesn't remove effects. Stop.
To make it work have Overbright and Green Filter turned off before you open MXO. Stop.
Bayamos, is there any way to change the contrast (Not quite gamma) and brightness? And the saturation?
I'm thinking messing with the Green Tint options and set all the colors to -1 or something like that could help desaturate the image... I dunno.
I'm thinking messing with the Green Tint options and set all the colors to -1 or something like that could help desaturate the image... I dunno.
There's no specific parameters for contrast/brightness/saturation. The Green Tint options thing might work for Saturation; I've found that messing with Overbright options usually results in a dark blurry mess.
Another thing you could try (if you have an ATI video card) is RADlinker. It's an application that will allow you to set shortcuts to apply certain graphic settings to certain processes; in the Color tab you should be able to set Brightness and Contrast.
Another thing you could try (if you have an ATI video card) is RADlinker. It's an application that will allow you to set shortcuts to apply certain graphic settings to certain processes; in the Color tab you should be able to set Brightness and Contrast.
can someone direct me to the anti aliasing section of the useropts. option
I have another question... does the code need to be placed in a note pad and saved as useropts.cfg and then placed in the mxo folder? cuz i've tried and its not working.
please advise.
CLAUDIUS wrote:
Yeah, that's how it works. Make sure that after you save the useropts.cfg you go to that folder in Explorer and make sure it didn't save it as useropts.cfg.txt. To do that go to Tools/Folder Options... . Then click on the File Types tab and uncheck "Hide extensions for known file types". Then recheck the extension on useropts.cfg . That's what I had to do to ensure that it worked.
I have another question... does the code need to be placed in a note pad and saved as useropts.cfg and then placed in the mxo folder? cuz i've tried and its not working.
please advise.
Yeah, that's how it works. Make sure that after you save the useropts.cfg you go to that folder in Explorer and make sure it didn't save it as useropts.cfg.txt. To do that go to Tools/Folder Options... . Then click on the File Types tab and uncheck "Hide extensions for known file types". Then recheck the extension on useropts.cfg . That's what I had to do to ensure that it worked.
kool, i got it to work thanks
wat would be the comand to make it be rainy all the time and have the wind pick up a lil more
You can't do that with useropts. Changing the weather cycle or perm_rezevents is admin-only, and is server-side not clientside. Aside from hacking your game install and altering the weather textures, animations, etc. (which would get you in trouble, and make patching a nightmare), there's no way you'd be able to do this unless they somehow decide to let players play with weather. Sorry.
so i take it you cant change the weather to be allways on that nice bluesky, that was awsome , i would like to see it again
Is it possible to see NPC's or Players furthur?
as at the moment they disapear after 100m or so, but yet I can still see buildings for miles.
as at the moment they disapear after 100m or so, but yet I can still see buildings for miles.