
Hey everyone, right so I've been working on a comic project for MxO, as many folks are probably doing I'm sure, but I'm doing it ala Sin City style. While trying to figure out how to do this, I realized that simply desaturating an image, or turning it black and white / grayscale just wasn't giving me the effect I needed. So I set out to create a way to give my screenshots a Miller-esque feel to them. Now I don't have the talent that alot of folk around here have (I must learn skin texture and hairlines O.O). That being said, I created this tutorial, partially because I had nothing else to do, and partially because I want to see if people like the method I've come up with. I'm sure it's been done before but hey...try it, you might like it  Without further adue here we go:
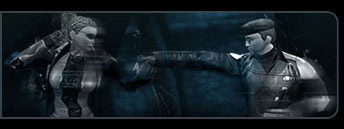
First Off, We’re going to open up the picture we want obviously, little does my RSI know he is about the be thrust into the wondrous and magical world of comic book noir.

In the next step I suggest resizing the image so that once we are done with all our photo-manipulation and we resize the image to its original dimensions, we have a nice crisp resolution. We adjust the size by going to Image>Image Size and keeping the proportions constrained I like to just double the image size, so in this case as you can see I’ve changed the 1024x768 to 2024x1518.
Step two is going to be to duplicate the layer – with the background selected right click and select Duplicate Layer, name it whatever you like (You can see I’ve named it Stamp Layer).
Now we can start having some fun, first we are going to go to our good old friend Gaussian Blur. Making sure that you have the Stamp Layer selected (again whatever you named the copy of the background layer) go to filter>blur>Gaussian Blur. Once the controls pop up, move the slider all the way to the left and then move it right until you’re comfortable with the image, I like a nice even subtle blur, so with this image I have chosen to go with a radius of 2.0 pixels.

Now moving on, we are going to apply a stamp filter to this level, this is pretty much the meat and potatoes of this tutorial so…yea pay attention and feel free to experiment. To apply the stamp filter go to Filter>Sketch>Stamp, now at this juncture you need to play around to get the desired effect you’re looking for, you can see the settings I’ve chosen, but they’ll be different for every pic so mess around with them until you have what you want. Moving the slider for Light/Dark Balance to the left increases the white parts, and to the right increase the black parts. I have chosen a light/dark balance of 7 and a smoothness of 3.
As you can see, we’re pretty much done with the coloring for the most part, but the image itself is still a little too bright, its kind of overpowering because the white areas are so bright and contrasting to the black areas, now there are plenty of different ways to darken things up, some folks like the burn tool.

You could stop the tutorial right here if you like the whole mega-contrast thing though. For this particular tutorial I have decided to use a Clouds filter, mainly because I don’t want to darken everything, I want a sort of smattering effect of darkness. We want to add our clouds on a new layer though, because we are going to do some blending/erasing with them. So create a new layer and name it what you like I’ve named it Clouds. Then with the clouds layer selected go to Filter>Render>Clouds. A smattering of dark cloudiness as shown below should now cover your pic.
This is another area where you’re free to experiment as you like, we are going to change the clouds layer’s blending options to fade it into the picture and give our bleached black&white some simple texture. I have chosen to use the Darken blending option as you can see below. You can also change the opacity if the clouds are too dark overall; I’ve chosen opacity of about 80%.


Now we can’t leave it like this can we? It isn’t blended quite the way we want it, so we’re going to use the eraser tool on the cloud layer, to remove any unsightly and unwanted cloudiness. First we’re going to size the image back down to 1024x768 to make the erasing job more manageable (you can omit this step if you really want to dive in and do some serious detail work). I chose a large soft brush (200pix and softness at max), this way you can fade away a large portion (such as the face, or whatever). Instead of just continually erasing, I like to erase in dabs, just one click where I need it, several clicks in certain spots until the clouds are all gone if you like, but if you’re using a hard brush you won’t want to use that method as you’ll get unsightly overlapping.

Once the erasing is done, you’re pretty much good to go, like I said, feel free to mess with the opacity and blending options as you please, here is the completed picture:

There You have it folks, this is the finished base image, you can then add whatever else you’re going to, such as a border or perhaps some text or whatnot. Hope you enjoyed this and found it useful. Let me know anything and everything you think about this...while I may not have the skills of some of the folks around here...I still like to contribute when I can.
Without further adue here we go:First Off, We’re going to open up the picture we want obviously, little does my RSI know he is about the be thrust into the wondrous and magical world of comic book noir.
In the next step I suggest resizing the image so that once we are done with all our photo-manipulation and we resize the image to its original dimensions, we have a nice crisp resolution. We adjust the size by going to Image>Image Size and keeping the proportions constrained I like to just double the image size, so in this case as you can see I’ve changed the 1024x768 to 2024x1518.
Step two is going to be to duplicate the layer – with the background selected right click and select Duplicate Layer, name it whatever you like (You can see I’ve named it Stamp Layer).
Now we can start having some fun, first we are going to go to our good old friend Gaussian Blur. Making sure that you have the Stamp Layer selected (again whatever you named the copy of the background layer) go to filter>blur>Gaussian Blur. Once the controls pop up, move the slider all the way to the left and then move it right until you’re comfortable with the image, I like a nice even subtle blur, so with this image I have chosen to go with a radius of 2.0 pixels.
Now moving on, we are going to apply a stamp filter to this level, this is pretty much the meat and potatoes of this tutorial so…yea pay attention and feel free to experiment. To apply the stamp filter go to Filter>Sketch>Stamp, now at this juncture you need to play around to get the desired effect you’re looking for, you can see the settings I’ve chosen, but they’ll be different for every pic so mess around with them until you have what you want. Moving the slider for Light/Dark Balance to the left increases the white parts, and to the right increase the black parts. I have chosen a light/dark balance of 7 and a smoothness of 3.
As you can see, we’re pretty much done with the coloring for the most part, but the image itself is still a little too bright, its kind of overpowering because the white areas are so bright and contrasting to the black areas, now there are plenty of different ways to darken things up, some folks like the burn tool.
You could stop the tutorial right here if you like the whole mega-contrast thing though. For this particular tutorial I have decided to use a Clouds filter, mainly because I don’t want to darken everything, I want a sort of smattering effect of darkness. We want to add our clouds on a new layer though, because we are going to do some blending/erasing with them. So create a new layer and name it what you like I’ve named it Clouds. Then with the clouds layer selected go to Filter>Render>Clouds. A smattering of dark cloudiness as shown below should now cover your pic.
This is another area where you’re free to experiment as you like, we are going to change the clouds layer’s blending options to fade it into the picture and give our bleached black&white some simple texture. I have chosen to use the Darken blending option as you can see below. You can also change the opacity if the clouds are too dark overall; I’ve chosen opacity of about 80%.
Now we can’t leave it like this can we? It isn’t blended quite the way we want it, so we’re going to use the eraser tool on the cloud layer, to remove any unsightly and unwanted cloudiness. First we’re going to size the image back down to 1024x768 to make the erasing job more manageable (you can omit this step if you really want to dive in and do some serious detail work). I chose a large soft brush (200pix and softness at max), this way you can fade away a large portion (such as the face, or whatever). Instead of just continually erasing, I like to erase in dabs, just one click where I need it, several clicks in certain spots until the clouds are all gone if you like, but if you’re using a hard brush you won’t want to use that method as you’ll get unsightly overlapping.
Once the erasing is done, you’re pretty much good to go, like I said, feel free to mess with the opacity and blending options as you please, here is the completed picture:
There You have it folks, this is the finished base image, you can then add whatever else you’re going to, such as a border or perhaps some text or whatnot. Hope you enjoyed this and found it useful. Let me know anything and everything you think about this...while I may not have the skills of some of the folks around here...I still like to contribute when I can.
