This tutorial details a very simple method to create funky realistic smoke from scratch using very basic Photoshop tools. Compared to other similar tutorials on the internet it may seem a little basic - after all, it makes no use of funky brushes, nor several filters, but the results are just as effective and much more user-definable.
Step 1: Open up or create a base image in Photoshop of any size and/or format. You can use a stock source or a simple Photoshop-created flame, but bear in mind that for the rest of this tutorial realism is paramount. If there is an open window near the flame source, the smoke trial will adjust accordingly. Likewise, the smoke will only show up if there is light showing through the particles of smoke, so try to avoid scenes with far too little, or far too much basic lighting. NOTHING looks more stupid and artificial than a poorly placed effect.
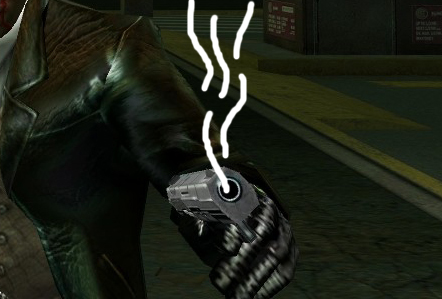
Step 2: Create a new transparent layer above the Background and make it the active layer. Using a soft-edged tip on the Brush Tool and a white foreground color, draw a few 'guideline whisps' following the general path that you want the smoke to follow.
TIP: There are numerous ways you can personalize this step - some people advise using a 'splatter' tip and the airbrush to obtain a whispier, more ethereal effect, but I personally do not find that it makes much difference.
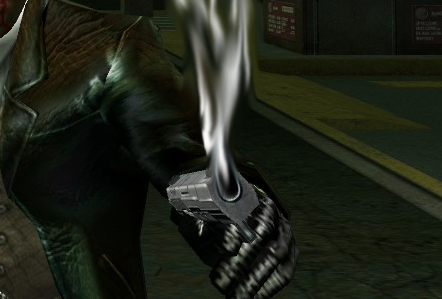
Step 3: Select the Smudge Tool with a soft tip around 10-20 pixels wider than smoke brush and set the strength to around 50%. Using smudge, stroke the smoke in the general direction of the air movement until it looks realistic. You can see my example in the image toward the left.
TIP: You can substitute the Smudge Tool for Filter > Liquify if desired, but near in mind that the liquify filter requires practice to use effectively, and can be a little too strong with default settings!
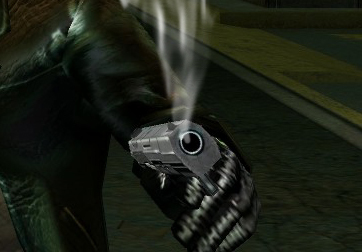
Step 4: Grab the Eraser Tool, set the flow to 100%, the opacity to 40%, and the tip to 10px wider than the one you used for the Smudge Tool in step 3. Using the eraser, remove some of the overly bright areas and give your smoke a little more depth. It may help to refer to a source photograph if you need reminding how smoke looks in a realistic environment.
Step 5: Nearly there! For the last step we need to use a gradient to fade out the smoke as it mixes with the air and floats further away from the flame-based light source. To accomplish this, make sure the smoke layer is active in the layers palette and click on the 'Add Layer Mask' button ( ) at the bottom of the layers palette. Press D on your keyboard to reset your color swatches and then select your Gradient Tool (this tool might be hidden under your Paint Bucket Tool). Duplicate the settings below. Your interface for the Gradient Tool may be different depending on your version of Photoshop and operating system, but all the options should still be present.

Now just lower your smoke layer's opacity to taste and you're finished! See, I told you it was easy! Feel free to experiment at your leisure - this sort of simple effect lends itself to many modifications and can be adapted to suit almost any purpose. Enjoy!