I received some good feedback on my recent thunderstorm image, so I
decide to share the wealth on how I made the storming rain. While there
is already a tutorial for rain, this should further help you in
increasing the chaotic and fluidity of a natural rain storm.
1. Start out with a black background and a blank layer. You'll need to
use a basic brush set to Dissolve at a low opacity like 9%. Scatter it
around the layer. Each pixel will eventually be your rain drops.

2. Repeat the first step until you have a decent amount of layers to
work with. You'll be wanting at least two of these. Now, use the
transform tool to enlarge and reposition each layer accordingly. Use a
Gaussian blur layer if necessary.

3. Now it's time to give your storm some motion with Motion blur, of
course. You can use whatever angle or direction you wish. My only
advice is to alter the angle by fractions or single units for each
layer in order to achieve the natural shifted effect; this will give
your rain both depth and movement a single layer with Noise cannot.

4. After that, create a new layer. Use the line tool set to at least 2
pixels and start making individual rain drops going in the same
direction as the rest of the storm.

5. You'll need to use the Smudge tool on the "tails" of the rain drops
to invoke a certain amount of progress for the rain's descent. Use this
opportunity to alter the shape of each drop appropriately.

6. Use Gaussian and Motion blur where necessary. Apply the eraser tool
as well and adjust the opacity until you're pleased with how the "short
distanced" rain drops look.

7. Now all that's needed are "close-up" rain drops. These can easily be
made by duplicating the "short distanced" rain drop layer and enlarged
greatly with the transform tool. Duplicate and reposition as required
until you reach a nice middle ground.

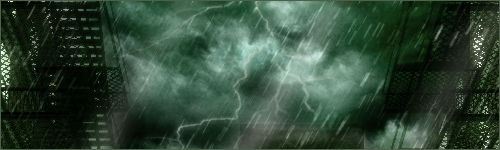
You now have a rain storm! If you wish, add buildings in the
background, objects in between layers of rain, lightning... Tweak the
image to your heart's desire...

decide to share the wealth on how I made the storming rain. While there
is already a tutorial for rain, this should further help you in
increasing the chaotic and fluidity of a natural rain storm.
1. Start out with a black background and a blank layer. You'll need to
use a basic brush set to Dissolve at a low opacity like 9%. Scatter it
around the layer. Each pixel will eventually be your rain drops.
2. Repeat the first step until you have a decent amount of layers to
work with. You'll be wanting at least two of these. Now, use the
transform tool to enlarge and reposition each layer accordingly. Use a
Gaussian blur layer if necessary.
3. Now it's time to give your storm some motion with Motion blur, of
course. You can use whatever angle or direction you wish. My only
advice is to alter the angle by fractions or single units for each
layer in order to achieve the natural shifted effect; this will give
your rain both depth and movement a single layer with Noise cannot.
4. After that, create a new layer. Use the line tool set to at least 2
pixels and start making individual rain drops going in the same
direction as the rest of the storm.
5. You'll need to use the Smudge tool on the "tails" of the rain drops
to invoke a certain amount of progress for the rain's descent. Use this
opportunity to alter the shape of each drop appropriately.
6. Use Gaussian and Motion blur where necessary. Apply the eraser tool
as well and adjust the opacity until you're pleased with how the "short
distanced" rain drops look.
7. Now all that's needed are "close-up" rain drops. These can easily be
made by duplicating the "short distanced" rain drop layer and enlarged
greatly with the transform tool. Duplicate and reposition as required
until you reach a nice middle ground.
You now have a rain storm! If you wish, add buildings in the
background, objects in between layers of rain, lightning... Tweak the
image to your heart's desire...