Hello folks. I'm bringing this tutorial to you in hopes that you may benefit from it somehow. The tutorial encompasses how I make my images/signatures 'enhanced' looking. You'll have to excuse the image quality of the tutorial steps (irony is so evil), though once you fire up Photoshop and do as I instruct you'll be right as rain.
Step #1

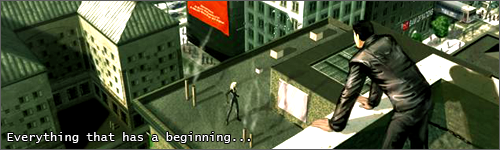
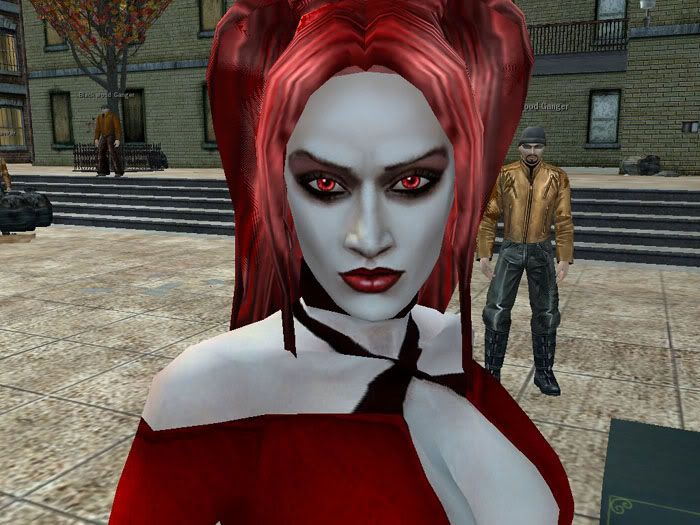
Open the screenshot that has what you want and crop it. The first vital element to every enhanced image is the way giant screenshots can be cropped and condensed into a smaller resolution. What this means basically is that when you crop a full 1024x768 pixel area as a 600x450 picture you'll effectively be making the quality to your full-sized image two times fresher and smoother looking. For this tutorial I chose to use a smaller portion of a 1024x768 screenshot.
Step #2

Now that we've established the area of the picture we are satisfied with we'll need to duplicate the background layer. You can do so by going over to the Layers/Channel/Paths window (You may need to open one up in you PS workspace by going up to Window on the taskbar near Help and selecting Layers) and right-clicking on the Background layer to see the available options as shown above.
Step #3

Now comes the fun part. Go up to Filter and search in the Blurs until you see Gaussian Blur. Make sure you have the duplicate layer (Background copy) you made earlier selected.
Step #4

You'll want about 3.0 or more for the radius of your blur.
Step #5

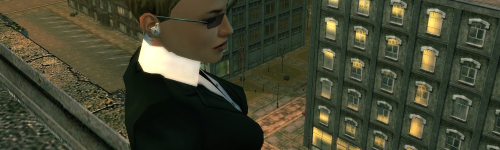
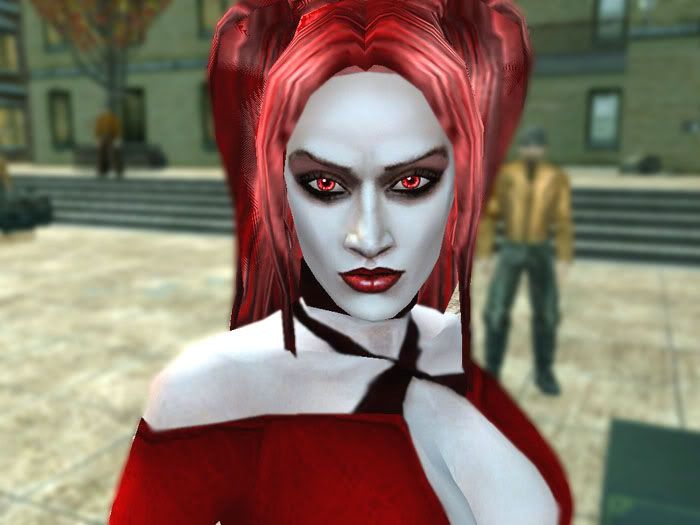
After you have blurred the copied layer, change its opacity to somewhere between 50% and 90%. I like 70% for no apparent reason as seen above. Now we're starting to see some improvement! Good deal. This is the basics of the basic right here; however it acts as like a foundation of sorts. Now let's move on to even more good stuff.
Step #6

These steps you don't have to follow in order, but I'll briefly explain what each one does and how it is done. Here we will be using Adjustment Layers. These types of layers are vital for any sane Photoshop user, and et, many people don't know about them. Here we see contrast/brightness being selected.
Step #7

Mess around with the slides until the picture looks more glowy than before. The key is to keep the contrast and brightness near each other on the scales which means don't forget about either of them when it comes to increasing/decreasing.
Step #8

Mmm, saturation.
Step #9

-40 is a really good choice for the amount of saturation you'll need. If you're feeling crafty you can try something else, but -40 is what I always use.
Step #10

Looking sexy. Now it's time for a little help from Mr. Eraser Tool. He'll put a smile on your face. Or wipe it off... When erasing certain spots of the copied layer you'll want to get it as tight as possible. Which means no going overboard with the eraser and possibly erasing blurred sections you might not want gone. Remember that there's always Edit > Undo. Generally the face of the subject in an enhanced image should be crisp, so erase the spots of blur on the face and the hands and details on the clothes (like buttons and pockets).
Step #11

Now's the time for another adjustment layer. This step should only apply for screenshots that are taken when the game settings have Green Tint turned off.
Step #12

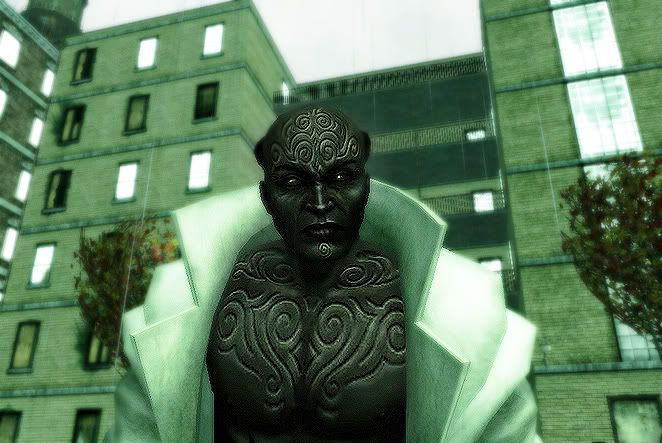
25 Green and -10 Cyan ALWAYS do the trick when you want the perfect Matrix-esque green tint without the in-game lag.
Step #13

Almost there, folks. Now we're just going to seal the deal on the image part and open the floor for other things, such as text or further enhancements.
Step #14

If you followed the tutorial step-by-step for the first time and got a great looking Matrix-esque image then: Congratulations! Enjoy. If not, please feel free to post in this thread any questions or comments.
But remember: This is just a guideline of rules. Some can be bent. Others can be reinvented... It's all about the strength of your, what I like to call, inner eye and having fun while training it.

Step #1
Open the screenshot that has what you want and crop it. The first vital element to every enhanced image is the way giant screenshots can be cropped and condensed into a smaller resolution. What this means basically is that when you crop a full 1024x768 pixel area as a 600x450 picture you'll effectively be making the quality to your full-sized image two times fresher and smoother looking. For this tutorial I chose to use a smaller portion of a 1024x768 screenshot.
Step #2
Now that we've established the area of the picture we are satisfied with we'll need to duplicate the background layer. You can do so by going over to the Layers/Channel/Paths window (You may need to open one up in you PS workspace by going up to Window on the taskbar near Help and selecting Layers) and right-clicking on the Background layer to see the available options as shown above.
Step #3
Now comes the fun part. Go up to Filter and search in the Blurs until you see Gaussian Blur. Make sure you have the duplicate layer (Background copy) you made earlier selected.
Step #4
You'll want about 3.0 or more for the radius of your blur.
Step #5
After you have blurred the copied layer, change its opacity to somewhere between 50% and 90%. I like 70% for no apparent reason as seen above. Now we're starting to see some improvement! Good deal. This is the basics of the basic right here; however it acts as like a foundation of sorts. Now let's move on to even more good stuff.
Step #6
These steps you don't have to follow in order, but I'll briefly explain what each one does and how it is done. Here we will be using Adjustment Layers. These types of layers are vital for any sane Photoshop user, and et, many people don't know about them. Here we see contrast/brightness being selected.
Step #7
Mess around with the slides until the picture looks more glowy than before. The key is to keep the contrast and brightness near each other on the scales which means don't forget about either of them when it comes to increasing/decreasing.
Step #8
Mmm, saturation.
Step #9
-40 is a really good choice for the amount of saturation you'll need. If you're feeling crafty you can try something else, but -40 is what I always use.
Step #10
Looking sexy. Now it's time for a little help from Mr. Eraser Tool. He'll put a smile on your face. Or wipe it off... When erasing certain spots of the copied layer you'll want to get it as tight as possible. Which means no going overboard with the eraser and possibly erasing blurred sections you might not want gone. Remember that there's always Edit > Undo. Generally the face of the subject in an enhanced image should be crisp, so erase the spots of blur on the face and the hands and details on the clothes (like buttons and pockets).
Step #11
Now's the time for another adjustment layer. This step should only apply for screenshots that are taken when the game settings have Green Tint turned off.
Step #12
25 Green and -10 Cyan ALWAYS do the trick when you want the perfect Matrix-esque green tint without the in-game lag.
Step #13
Almost there, folks. Now we're just going to seal the deal on the image part and open the floor for other things, such as text or further enhancements.
Step #14
If you followed the tutorial step-by-step for the first time and got a great looking Matrix-esque image then: Congratulations! Enjoy. If not, please feel free to post in this thread any questions or comments.
But remember: This is just a guideline of rules. Some can be bent. Others can be reinvented... It's all about the strength of your, what I like to call, inner eye and having fun while training it.